You have the freedom to take advantage of its rich media functionalities by adding photographs, include text and post videos, to name but a few.
Tumblr is a microblogging platform and social networking website which allow users to post content and follow other users’ blogs.
They also seem to be free of some of the constraints given by Facebook and Twitter, while at the same time having similar social sharing features.
Giving you the opportunity to publish your content from Tumblr across all social media platforms (Twitter, Facebook, RSS feed using Feedburner and even an email and mobile publishing system) makes managing online social media content a breeze.
It makes perfect sense to us that Tumblr can be counted in as one of those platforms actually to be reckoned with and it is clear to see why online retailers will see Tumblr as the go-to platform for any marketing strategy.
Let’s have a look at how you can add your Instagram widget to Tumblr.
Adding your Instagram, Facebook or Twitter widget to your Tumblr blog is easy.
Follow these steps to create your widget.
Once you’ve created your widget, follow the appropriate steps below to add it to your blog.
- Log in to Tumblr and go to your Dashboard.
- Click on the Account button.

- Select Edit appearance.

- Under Website Theme, click on Edit theme.

- Click on Edit HTML.

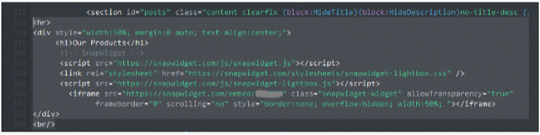
- To display the widget in a better format, we can add a few tags to the snippet:
- A
<hr>tag to display a horizontal line above the widget. - Header tags, e.g.
<h1> Our Products </h1>. You can use<h2>or<h3>as well depending on the required header type. - Encapsulate the widget in a
<div>area with the widget centered in the chosen area, the width of the widget set to a % of the chosen area, and the header text centered as well. - You can also change the width of the SnapWidget widget in the snippet code but this will only be applicable for this instance, anywhere else you display your widget it will be as you set it up on your SnapWidget dashboard.

- You can make changes to these settings to suit your taste.
- Let’s look at a few places where you can display your widget.
Tip: Working in the HTML editor with Line wrap toggled on makes reading your HTML code very difficult due to the shared Preview pane.
To make reading your HTML code easier, click on the Edit options button.

Toggle Line wrap to OFF.


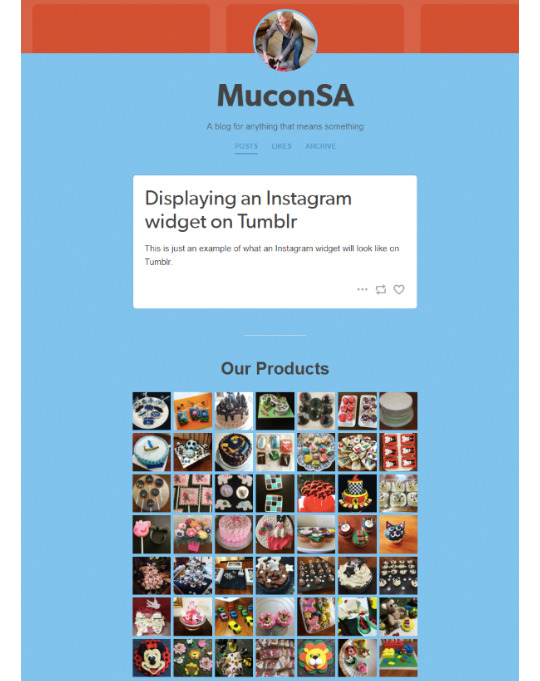
Insert widget before any posts but after the navigation line.
-
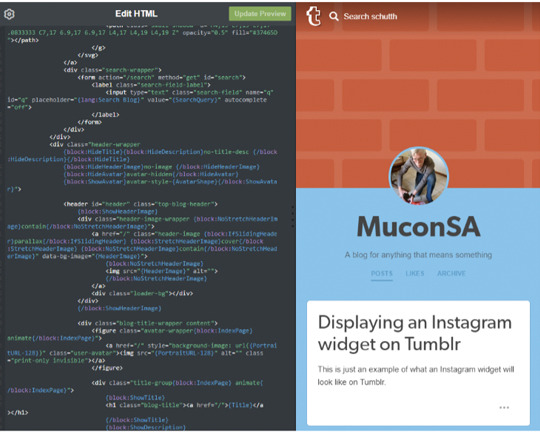
In the HTML file, search for the following line (should be at ~ line 322).
<section id=“posts” class=“content clearfix {block:HideTitle{block:HideDescription}no-title-desc -
Insert your snippet just below this line (Tip: add a
</br>tag at the end of the snippet to insert a break between the widget and the post).
- Click on Update Preview to preview your changes in the preview pane.
(Note that the widget is responsive, the preview will display the page based on the width of the preview pane so the widget could appear narrower than real!)

- This will display as follows on your blog page (before any posts, but after the navigation line).

- Click on Save to update your blog.
Insert widget at the bottom of the posts content.
- In the HTML file, search for the following line (should be at ~ line 1443).
</div> <!– .main –> - Insert your snippet just before this line.
- Click on Update Preview to preview your changes in the preview pane.
(Note that the widget is responsive, the preview will display the page based on the width of the preview pane so the widget could appear narrower than real!)
- This will display as follows on your blog page (at the bottom of the posts contents before the footer, max width = width of the posts container).
- Click on Save to update your blog.
Insert widget in the sidebar.
- In the HTML file, search for the following line (should be at ~ line 1444).
<div class=”sidebar”> - Insert your snippet just after this line.
- Click on Update Preview to preview your changes in the preview pane.
(Note that the widget is responsive, the preview will display the page based on the width of the preview pane so the widget could appear narrower than real!)
- This will display as follows on your blog page (in the sidebar, max width = width of the sidebar).

- Click on Save to update your blog.
Check out our how-to video tutorial on youtube: https://youtu.be/lzAAFqmdVrk